Audio Effects
Audio effects are used to modulate and manipulate a sound source in order to create more experimental sonic results. Let’s learn how to start incorporating effects into our web project!
Adding Audio Effects into the Signal Path
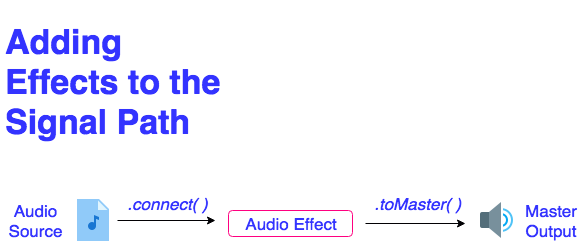
In order to pass sound from our sound source into an audio effect, we need to complete the following steps:
- Build our chosen audio effect, assign it to a variable, and connect its output to the Destination speakers (using the .toDestination( ) method)
- Build our sound source, assign it to a variable, and connect its output to our audio effect (using a new method called .connect( )
- The argument passed into the .connect( ) method is the variable we created to store our audio effect
Here is an example of how to add an audio effect into your code and attach it to the output of your sound file player. In the code embedded below, we create a delay effect and send the output of our Tone.Players object through the effect before it gets passed to our Destination output speakers. The sound, rather than moving directly from A -> B, is now moving from A -> C -> B. where A is the source file, B is the speaker, and C is the delay effect.
See the Pen Example Code by LSU DDEM ( @lsuddem) on CodePen.
https://codepen.io/lsuddem/pen/QxBmpmEvery effect has a universal parameter called its wet value. The wet value represents the proportion of mix between the original, un-altered (or “dry”) sound source signal coming into the effect and the effected (or “wet”) signal coming out of the effect. Try adjusting the slider in the embedded code above to hear the resulting sound at various rations of dry/wet mixes.
Remember to build your audio effects before you try to connect your sound source to them using the .connect( ) method. If you attempt to connect a sound source to an effect that hasn’t been built yet, your code won’t render even if your code has no other mistakes. Since our code is read from top to bottom, it’s best to put the code that builds your effects above any code that connects sound sources to them, like below:
let effect1, effect2, effect3, effect4;

function preload(){

effect4 = new Tone.Freeverb().toDestination();
effect3 = new Tone.PitchShift(2).connect(effect4);
effect2 = new Tone.Tremolo(4, 0.6).connect(effect3);
effect1 = new Tone.FedbackDelay(0.5, 0.5).connect(effect2);

player = new Tone.Player('sound.mp3').connect(effect1);
}
By building the elements in this order, you can see the direct pathway from the speakers, through the effect chain, back to the sound file. Changing the order will cause the code not to execute because it will try ot connect a sound to an object that has not been created yet.Building the objects in preload ensures that the pathway is properly rendered prior to any potential sound playback triggers.
Another way to format effect connections
You can also format your connections like shown below. There will be no change in how the code functions, but you don’t have to worry about building things in the wrong order as much.
let effect1, effect2, effect3, effect4;

function preload(){

 effect4 = new Tone.Freeverb();
 effect3 = new Tone.PitchShift(2).;
 effect2 = new Tone.Tremolo(4, 0.6);
 effect1 = new Tone.FedbackDelay(0.5, 0.5);

 player = new Tone.Player('sound.mp3');
}

function setup(){
 player.connect(effect1);
 effect.connect(effect2);
 effect2.connect(effect3);
 effect3.connect(effect4);
 effect4.toDestination();
}
Both ways are correct, and either one can be used depending on which is preferred by the coder. It is recommended that you pick one and stick with it for all of your sketches, so that way you don’t accidentally make a formatting mistake by switching between them.
Common Audio Effects
Tone.js has a large collection of audio effects that can be used to modulate a sound source. Below, we discuss some of the most commonly used audio effects and demonstrate how we can use them. To see a complete list of possible audio effects and their parameters in the Tone.js library, head to the library’s API documentation by clicking here.
Each audio effect listed on this page and the Tone documentation has a large number of parameters you can control with a slider.
Reverb
Reverb is the persistance of a sound that continues after the original sound has ceased. It is made up of many echos bouncing off the walls of a space and gives us cues to the size of that space. If you have ever been in a very large room, think church, stadium etc; and heard your voice echo around it, this is reverb.
Reverb Parameters
- roomSize - the amount of time for the sound to decay.
See the Pen Example Code by LSU DDEM ( @lsuddem) on CodePen.
https://codepen.io/lsuddem/pen/oyaRoEDelay
A delay effect records a sound into a buffer and plays it back after a certain period of time. The example below demonstrates a particular style of delay known as a PingPong Delay. This causes the delayed sound to pan back and forth between your right output speaker and your left output speaker.
Delay Parameters
- delayTime - the time between consecutive echos.
- feedback - the amount of the effected signal which is fed back through the delay.
See the Pen Example Code by LSU DDEM ( @lsuddem) on CodePen.
https://codepen.io/lsuddem/pen/KeGLedDistortion
Gives sound a “fuzzy”, “growling”, or “gritty” tone by increasing the amount of electric signal going through the circuit. Think electric guitar.
Distortion Parameters
- distortion - the amount of distortion (must use a nominal range of 0-1)
- does not require the addition of .value to modify
See the Pen Example Code by LSU DDEM ( @lsuddem) on CodePen.
https://codepen.io/lsuddem/pen/GGYaLLTremolo
Tremolo is the variation in amplitude of sound achieved through electronic means. Musically, it results in a “warbly”, vibrato-induced sound. This effect works best on longer duration, sustained sounds.
Because the tremolo effect relies on an oscillator to generate the amplitude change, we need to add the .start( ) method upon creation of the effect. This can be done on the same line, right after the .toDestination( ) method is called. More information on oscillators can be found in the Resources section, as well as the next chapter.
Tremolo Parameters
- frequency - the rate of the effect, resulting in faster vibrato or slower vibrato
- depth - the depth of the effect upon the sound source
See the Pen Example Code by LSU DDEM ( @lsuddem) on CodePen.
https://codepen.io/lsuddem/pen/jKQKdPBitCrusher
Bitcrusher is a distortion effect that creates a lo-fi version of the incoming sound source through a digital reduction of the audio’s resolution (as known as its bit depth).
BitCrusher Parameters
- bits- the number of bits to down sample the signal (must use a nominal range of 1 to 8)
- does not require the addition of .value to modify
See the Pen Example Code by LSU DDEM ( @lsuddem) on CodePen.
https://codepen.io/lsuddem/pen/pKQmPMPitchShift
PitchShift is an effect that changes the pitch of an incoming sound source by shifting its pitch up or down by a designated number of half steps. For audio files, this is done without having to change the player’s playbackRate property.
PitchShift Parameters
- pitch- the number of half steps to shift the sound in pitch (positive numbers shift the pitch higher, negative numbers shift the pitch lower, and “0” keeps the sound at its original pitch
- does not require the addition of .value to modify
See the Pen Example Code by LSU DDEM ( @lsuddem) on CodePen.
https://codepen.io/lsuddem/pen/RJEYLrChorus
A Chorus effect combines elements of the Delay and Tremolo effects. An incoming sound source is slightly delayed and layered on top of the original, allowing one sound source to be perceived as a group of many. They layered, delayed “copies” are then modulated in amplitude, causing their pitch to waver slightly and not perfectly match the pitch of the original source. This simulates a natural effect that occurs when a chorus of singers or a group of instruments perform the same note simultaneously, with each individual performer playing slight out of tune from the next. This effect works best with a delay time between 2 and 20 milliseconds, and a slower frequency of modulation.
While the chorus effect is similar to the Tremolo effect, we do not need to start an internal oscillator by adding the** .start( )** method upon creation of the effect. Also, the delayTime parameter for this effect does not need the additional .value property in order to be changed.
Chorus Parameters
- frequency - the rate of the effect, resulting in faster vibrato or slower vibrato
- delayTime - The delay time in milliseconds of the chorus (nominal range for a Chorus delay time is between 2 and 20ms)
- does not require the addition of .value to modify the parameter for this effect
- depth - the depth of the effect upon the sound source
See the Pen Example Code by LSU DDEM ( @lsuddem) on CodePen.
https://codepen.io/lsuddem/pen/vrbNQP## Adjusting Parameter values with sliders
To change an aspect of our sound while it is playing we can use a slider. To make a slider in p5.js use createSlider():
createSlider(min,max,[value],[step]);
- min - minimum value of the slider
- max - maximum value of the slider
- value - default value of the slider [optional]
- step - step size for each tick of the slider (if step is set to 0, the slider will move continuously from the minimum to the maximum value) [optional]
Remember: when a function’s arguments are listed inside of flat brackets in a syntax example or on an API document, this indicates that those arguments are optional, and are not required in order for the function to run successfully. In the case of createSlider(), the first two arguments (min and max) are required, while the second two (value and step) can be added if you’d like to have more control over how your slider behaves. Keep in mind that you will have to manually position your slider using the .position() method since none of the arguments above actually control the position of the slider.
To get the current value of the slider and use it in your code, call for slider.value() and attach it to a property of your player/effect (more in next lesson).
let slider;

slider = createSlider(0, 1, 0.5, 0.01);
slider.position(width / 2, height / 2);


reverb.roomSize = sliver.value();
Labeling your slider
It’s a good idea to label any sliders used to control your sampler so that you know what they do. Sliders do not have a built in label, so without some way to identify them, people using your codes will not know what the slider is controlling. Here is a quick reminder of how the text() function works:
text(str,x,y);
- str - the alphanumeric symbols to be displayed, beginning at the x-coordinate of the textbox.
- x - the x axis coordinate of text.
- y - the y axis coordinate of text.
In the code below, we use a button to trigger the playback of each sound and a slider, labeled “[File Name] Playback Speed” to change the playback speed rate of our sound while it plays:
See the Pen Example Code by LSU DDEM ( @lsuddem) on CodePen.
https://codepen.io/lsuddem/pen/LrJrVeFinal Notes
Looking at these examples, we can see how the triggers for these sound playbacks are kept in their own functions to be triggered by buttons. The slider positions are checked and applied to the intended property every time the draw() function loops, and the signal pathways and sound files are loaded occurs inside of preload(). All buttons and sliders are created inside of setup().
Using the information from the previous pages, we will now build a sampler that triggers multiple sounds, and applies adjustable effects to those sounds.
One final note: After you finish building your effects, you can connect them all in one line with the .chain() method. THe syntax is:
Tone.Player('soundfile').chain(effect1, effect2, effect3, Tone.Destination)
Let’s Practice!
Start by loading a single sound into a new Tone.Player(). Then, use .connect() to connect the sound output to an effect, then to the destination speakers.
When you are done, try adding as many effects as you can to the signal pathway. Use the effects listed here and the Tone.js reference pages to create unique manipulations of the sounds.
Finally, add a few sliders to the canvas to be able to update the parameters of the effects to further customize your sounds.
Effect Chains with Tone.Players()
Generally, everything we have mentioned so far can be applied to both the Tone.Player() and Tone.Players() objects, however there are a few key differences to mention before we move on.
First, if we were to build our code like shown below, we run into an interesting scenario. Can you identify it?
let multiplayer, reverb, delay;

function preload(){
multiplayer = new Tone.Players({
sound1: "sound1URL,
sound2: "sound2URL
});

reverb = new Tone.Reverb();
delay = new Tone.FeedbackDelay();
}

function setup(){
  multiplayer.connect(reverb);
  reverb.connect(delay);
  delay.toDestination();
}
The scenario we run into is that whenever we trigger a sound from the multiplayer, regardless of the sound it will be sent through the same effect chain. This isn’t necessarily a bad thing, but can be problematic in certain scenarios. Let’s say we wanted to have unique could pathways, but didn’t want to have multiple sound players since that is a lot of redundant typing. The example below achieves that:
See the Pen Example Code by LSU DDEM ( @lsuddem) on CodePen.
https://codepen.io/lsuddem/pen/VwmXxmQIn words, the steps are:
* Create the Tone.Players() object and any effects needed in preload().
* Store the Players.player(soundFileName) command within a variable inside of setup().
* Refer to this new variable when creating the connections within setup and playing back audio.
Below is a video showing how the code was made, and will let you hear how the various sounds can be routed.
Let’s practice:
Can you make a Tone.Players() object and route the audio through different effects? How many effects can you use? try to create a sketch with at least 5 different ones to see what sounds cool.