Nested Conditionals & Complex Boundary Measurement
In our last lesson, you may have noticed that our conditional tests looked a little repetitive. When measuring shapes that have multiple boundaries on the same X or Y coordinate, we can save ourselves the hassle of repeating portions of a test by using Nested Conditionals. The idea of nesting conditionals is a lot like the idea of nesting for loops. In fact, they even look similar on the screen.
Lets take a look at a diagram demonstrating the logic of a Nested Conditional to refresh our memories from Unit 1:
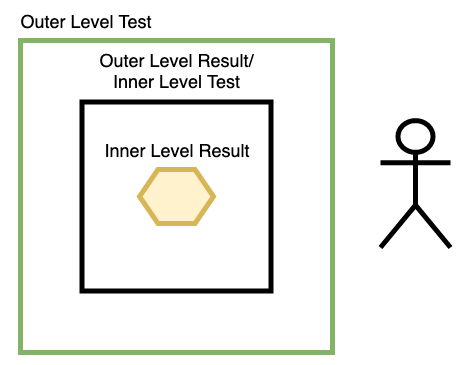
With a Nested Conditional, we embed an Inner Level Test inside of an Outer Level Test. Unless we pass the Outer Level Test, we cannot attempt the Inner Level Test (making the Inner Level Test synonymous with a result for the Outer Level Test). We can think of this a real-world challenge where out ultimate goal is to reach the golden hexagon shown in the picture below; if we can’t find a way to get past the green barrier, we won’t be able to get past the black barrier and get access to our reward:
As coders, using Nested Conditionals serves a number of practical purposes in addition to making our code look neat and tidy. While our previous boundary measuring tests weren’t too long, using multiple &&-linked sub-tests inside of one If Statement can make our code difficult to debug if that test isn’t working the way we want it to. Furthermore, Nested Conditionals allow us to devise more complex logic flows, which will in turn allow us to design more complex games and interactive art.
Nested Conditional Examples
Let’s take a look at a sketch similar to one we worked with in the last lesson. This time, we have two squares that we want to interact with. Clicking on both causes different results, so we need to use an If/Else If statement:
See the Pen Example Code by LSU DDEM ( @lsuddem) on CodePen.
https://codepen.io/lsuddem/pen/PveEKbThis If/Else If test (ending with an additional else to keep the background gray if neither square is clicked on) works fine, but imagine if we had 20 squares in a row to click on! Fixing just a handful of them that weren’t working right would be tough to debug. How can we condense some of the repeated sub-tests and break them about into a Nested Conditional?
Let’s start start to simplify things by finding repetition. First, both tests require that we check to see if the mouse has been pressed. Lets make that conditional into it’s own If/Else statement; if the mouse is pressed, we can run some more tests to see if we’re clicking inside a square, else the background stays gray:
if(mouseIsPressed){
//more tests to come
} else {
 backColor = "gray"; //something only happens if the mouse is pressed.
}
Now we won’t be able to check anything else unless the mouse click test is passed first, and we don’t have to repeat that test twice as a sub-test in our other conditionals (it will act like the green barrier in the picture above). Next, our two squares share the exact same Y coordinates on the canvas: the top boundary of each square is at 100 Y and their bottom boundaries are at 250 Y. This means we can condense these Y boundary measurements into their own second, inner test! If the mouse is located between these Y boundaries, we can continue on and check our X boundaries. We don’t have any result set up for failing this test, so we can simply use an If statement conditional here and add it into the Result section of the outer test (This additional test acts like the green barrier in the picture above):
if(mouseIsPressed){
  if((mouseY > 100) && (mouseY < 250)){

  }
} else {
 backColor = "gray";
}
We’re almost done! The X boundaries of each square are different, so we can’t condense our test any further than this. Our final tests will be placed inside the inner test we just wrote, and will serve as our reward for the mouse being clicked and being located inside of the Y boundaries of the two squares. Now we will need an If/Else If statement: if a click on the orange square occurs, change the background to lime, else if a click on the blue square occurs, change the background to gold. This is yet another layer before reaching our ultimate goal, and the entire Nested conditional will look like this:
if(mouseIsPressed){     //outer test
  if((mouseY > 100) && (mouseY < 250)){  //first inner test
    if((mouseX > 100) && (mouseX < 250)){  //third level test
      backColor = "lime";
    } else if((mouseX > 300) && (mouseX < 450)){  //third level test
      backColor = "gold";
    }
  }
} else {
 backColor = "gray";
}
The code below works just like our original version, but with our final Nested Conditional in place:
See the Pen Example Code by LSU DDEM ( @lsuddem) on CodePen.
https://codepen.io/lsuddem/pen/VOxyVaLet’s Practice!
Can you take what we have learned with nesting conditional statements and improve on the boundary measurement sketches from the last lesson?
Bracket Alignment & Test Levels
Nesting conditional statements helps show other coders the order of our decision-making logic in more ways than one. When practicing this, there are a few things to keep in mind:
- The braces of each conditional test ( { } ) act like barriers: they contain a result that can only be accessed if we pass the test coded inside the preceding parenthesis. Make sure to count your braces when nesting one test inside of another; a test with a missing brace is like a room with a missing wall. Most code editors will help you out by automatically adding a closing brace whenever you type an open brace, but always be sure to check for yourself!
- Study the code examples above and you’ll notice that for every new layer of conditional we added, we first started by indenting the if/else keywords, result code, and brackets closer to the center of the editor window. This is a really good way of visually showing the order of tests to both yourself and other coders. Outer/first tests should always have their brackets, results, and keywords closer to the left side of the editor window, and each inner level test should have its corresponding code indented further into the center.
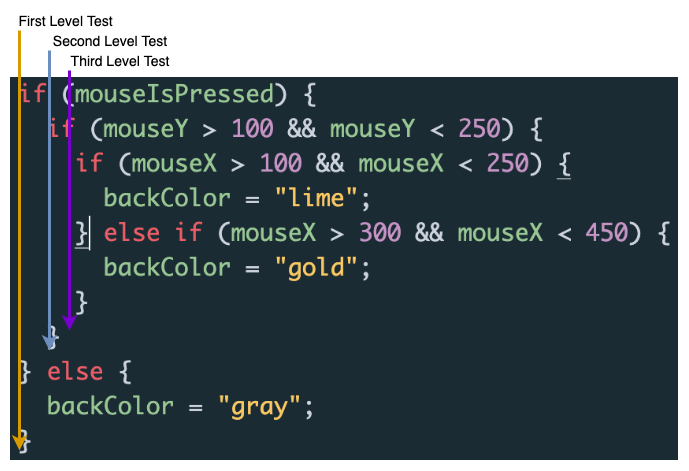
Below is some code (with out the graphics added) that you can copy into a sketch if you want. Notice how all of the braces line up vertically depending on their level of nesting. The first level and its else statement line up, then the second level test lines up vertically, before the multiple third level tests all appear at the same level of indentation from the screen margin. (and all the braces line up with the if() that they are paired to). This is a great way to easily see which tests belong in which level and keep your code easy to read.
if(mouseIsPressed){     //first level test
  if((mouseY > 100) && (mouseY < 250)){  //second level test
    if((mouseX > 100) && (mouseX < 250)){  //third level test
      backColor = "lime";
    } else if((mouseX > 300) && (mouseX < 450)){  //third level test
      backColor = "gold";
    }
  }
} else {
 backColor = "gray";
}
While your code might still work if you don’t follow this system, it will most likely lead to lots of confusion if you have to debug a problem and can’t visually tell which test belongs inside of which! Thankfully, most code editors have a “Tidy” or “Beautify” command that you can run in order to help auto-indent and clean up your code spacing. To do this in p5, you can click on the edit menu, then “tidy code”, or the much simpler “shift + tab” keyboard shortcut. Make like a touch easier for you (any anyone ready your code) by keeping it tidy!
Objects and Classes
All of the logic from the previous two lessons can be applied to objects within a class look back at the lesson on objects then check out this video which acts as a tutorial for both the content covered in these lessons, and how to apply the logic to an object within a class.