Getting Started
Let’s get started! In this first example, we’ll cover the basics of text-based coding in the JavaScript language.
Head to the P5.js Web Editor, sign up for a personal account, and open a new File. You’ll be presented with a new editor window that displays the code found in your “sketch.js” file. The P5 Web Editor starts you off with some basic code that is needed to create a blank, grey canvas.
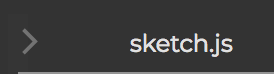
You can also edit and read the code found in your project’s HTML and CSS files by clicking on the arrow found near the upper lefthand corner of the editor panel:
And then clicking on the files that are listed:
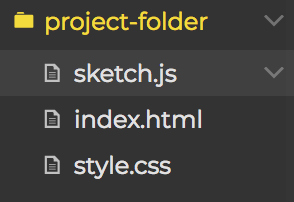
As we discussed, we will mainly be coding inside of the “sketch.js” file, so the P5 Web Editor presents this file to you automatically when a new project is created.
The other two files, HTML and CSS, have different functions that let the js file work efficiently. On a general level, the HTML file is the foundation that the code is built on. It tells the program where to find various resources and how to structure all of those resources. The CSS file is used for changing the appearance of various on-screen elements. Later in the course we will dive into the HTML file, but won’t be getting too much into the CSS as much.
Throughout this website several codes will be embedded to allow you to experience concepts or copy material into a P5 project. If for some reason these codes do not function as described in the text, you can click on the ‘edit on Codepen’ icon to see most of the codes on codepen.io. (This may happen more with codes in the sound unit for still unknown reasons.)
Saving Your Sketches
The P5 web editor lets you save your sketches to the cloud where you can access them from any web browser. Click file > save in order to save your sketch to your account. Keep in mind that if you don’t do this and you close the webpage then all of your work will be lost, so be sure to save and save often!
By default P5 names the sketch with two random words. You can click on this title (next to the run button) in order to rename it to whatever you want. Once you’ve done these things you can easily share your sketches with your teachers, friends, embed them in webpages, or share them however you want! Simply click file > share and copy the different urls for different formats.
For students, it is recommended to use the ‘edit’ link for various assignments so that teachers can see both the results and the code for grading and troubleshooting. Don’t worry, people with this link won’t be able to overwrite your code. They will have to click on file > duplicate to save a copy to their personal account where any changes will be saved as a separate file.
LETS PRACTICE!
Once you have made your account practice creating a new file and saving it. This may seem simple, but it is important since it will be impossible to submit assignments, come back to work on projects at a later time, or have your teacher be able to grade your work unless the sketch is properly saved!
Functions
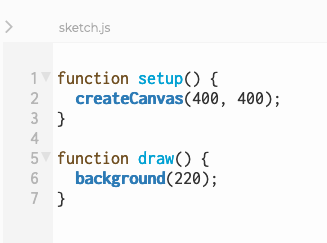
Take a look at the code below, which matches the code in your project on the P5 Web Editor:
See the Pen Example Code by LSU DDEM ( @lsuddem) on CodePen.
https://codepen.io/lsuddem/pen/MGMMXvWhen coding a project that uses the p5.js library, every JS file must contain the two large blocks you see below: function setup() and function draw(). These are functions: code elements that behave like actionable machines, producing a result. In our projects, we will be mainly calling for certain functions to be run inside of the two main function blocks you see here. These larger function blocks use a pair of curly braces ( “{ }” ) as boundary markers; any code that you want to place inside of these blocks must be typed between the open and closed curly brace pair.
In p5.js-based projects, code that is placed inside of the larger setup() and draw() blocks will behave differently based on which block they are called from within, and it’s important for us to understand the difference between their behaviors.
Any code inside of setup() will only be run once upon the loading of the HTML file. You can rerun anything in the setup() block by refreshing your browser.
The draw() function behaves like a loop. Any code placed inside this block will be read by our browser from top to bottom and executed over and over again. The speed of the draw() block loop is 60 cycles (or frames) per second.
Take a look at the embedded code below, and add the new console.log() lines into your project on the P5 Web Editor so that both code examples match. Once you’ve done that, hit the Run Button (shaped like a triangle/play button) at the top of your editor window, and watch the section below marked “Console.” After a few seconds, hit the Stop Button.
See the Pen Example Code by LSU DDEM ( @lsuddem) on CodePen.
https://codepen.io/lsuddem/pen/GGKdajPlace your cursor inside the Console section and scroll up. You should see the statements “Ready” and “Set” printed only once, and then a long list of “Go!” plus an increasing number statements listed after that. The first two statements only printed to the console once since the were coded inside thesetup() block, while the “GO!” statement printed multiple times. The increasing number attached to “GO!” represents the current iteration of the draw() loop.
Arguments
Functions can be given additional information in order to specify the way they behave. This additional information is known as an argument, and is added into the parenthesis found behind function names. In our previous example, the createCanvas(), background(), and console.log() functions all include arguments designed to specify their behavior.
In your code, try changing the single number argument found inside the parenthesis for the background() function like this:
background(96);
background() sets the color of the canvas background, and a single number between 0 and 255 will result in a black (0), white (255), or gray canvas. If we want something more exciting, we can add two more arguments into the background() function, each of them separated by a comma, like this:
background(96, 110, 220);
Our canvas background is now a shade of violet. When three arguments are passed into the background() function, it blends red, green, and blue hues together (in that order) based on the values you give it.
Each function in the p5.js library will require different types of data in different orders to adjust their behavior. Check the P5.js Reference Page to see a complete list of functions and their adjustable properties.
Remember, you are giving your computer a set of instructions to follow. If you just say “draw a square” but don’t tell the computer where or how large to draw the square, then your computer won’t be able to follow your instructions because it doesn’t have enough information.
LETS PRACTICE!
Now that you’ve had a little time to start getting familiar with the P5 environment and editing the basic code template, try to save your changes as a new file if you haven’s already. (file > save)
You can now open this file on any device by clicking file > open once you’ve logged into P5. Be sure to rename your sketch to something useful so you can find it later! Throughout this course we will be making several sketches and it will be impossible to find correct one using P5’s default naming scheme.
Once you’ve saved the sketch, try sharing it with the sharing links to see how they appear on other people’s computers.