Do it again - Loops
Why Use Loops?
Often times, projects that feature repeating patterns or duplicated actions result in a code that is overly long, and therefor difficult to troubleshoot. Take the following embedded code, which features a handful of alternating squares, as an example:
See the Pen Example Code by LSU DDEM ( @lsuddem) on CodePen.
https://codepen.io/lsuddem/pen/pKPLJZTake a look at the amount of repeating functions in our draw() block. We use one pair of fill() and rect() functions to create each square. Because of this, we would need 200 lines of code in order to make a line of 100 squares. There is also a significant amount of repetition within the arguments of each rect() function: the last three arguments (Y axis location, width, and height) of each rect() are exactly the same, with the X axis location being the only difference.
In order to simplify this process, we can create a self-contained loop that repeats a block of code for a set amount of times before stopping. This way, we can re-run the two lines of code needed to make the square as many times as we want without having to explicitly retype everything.
This second version of the project uses a type of loop known as a for loop to create 100 squares, alternating between teal and pink colors in the fill() function and placing each square 20 pixels away from the previous one. This results in a much shorter code that then we would have had if we didn’t use a loop :
See the Pen Example Code by LSU DDEM ( @lsuddem) on CodePen.
https://codepen.io/lsuddem/pen/PamXqdUnderstanding For Loops
The following logic chart breaks down the basic concept behind how a for loop works:
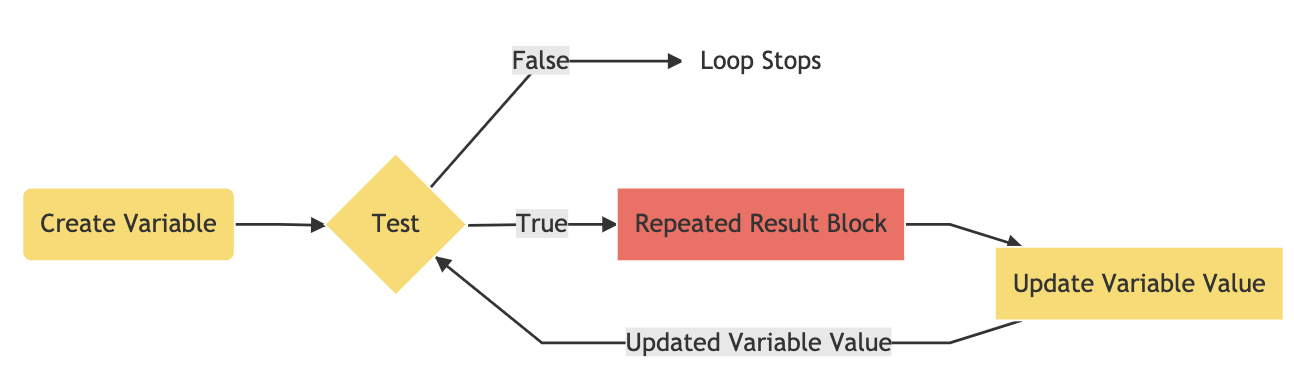
To create a for loop, we first design a set of statements that control how many times the loop runs and separate each one with a semicolon. First, we create a variable for use in the loop and initialize it with a starting value. This variable is typically given a one-letter label and is different from any other variable we are using elsewhere in our code. Next, we define a test that evaluates this variable on every loop and keeps the loop running as long as the test passes. If the test fails, the loop stops immediately. The test is always a relational expression, relating the value on the left to the value on the right (a table of common relational expressions and their operators can be found below). Finally, we write a statement that allows the loop variable to be updated every time the test is passed.
Translated into code, here is what the structure of a for loop looks like:
for (create variable; test; update variable){
   repeated result block
}
In the embedded code below, our loop draws multiple lines. The variable i is declared with an initial value of 20. The loop runs for as long as i is less than 400. Every time the test passes, the value of i is updated to be the result of itself plus 8 (20, 28, 36, etc.). When i grows to be bigger than 400, the loop stops. Try adding console.log(i) inside of the loop’s result block to see the growing value of i with each loop:
See the Pen Example Code by LSU DDEM ( @lsuddem) on CodePen.
https://codepen.io/lsuddem/pen/KemQoyBecause we are using the variable created in the for loop i as a variable for drawing our shapes, we are able to see the repeated pattern on the canvas. Without this, we would instead see, or not see, multiple copies of the lines drawn exactly on top of each other.
A for loop will run its test and display the results as fast as possible by your computer’s hardware, unlike functions like draw() that will run at a relatively slower 60 times per second.
Relational Expressions and their Operators
When designing for loops the logic behind the initial test is crucial. We can use the same operators as we did with conditional statements, but the consequences of having an incorrectly formatted test are much greater with for loops. In conditionals, if a test cannot pass, the conditional statement will never happen. However, in for loops, you have to design a test that will start as true and eventually become false. In the previous example the variable i began at the value 20 and was increased by 8 until it was no longer less than 400. the variable passing this threshold is what stops the value. If the wrong symbol had been used and the line read let i = 20; i < 400; i = i - 8 then i would be continually reduced and since it would never be greater than 400, the loop would never stop. This would effectively lock up your computer and you would have no choice but to close the tab, and possibly the entire browser before you could access your code again, effectively loosing any work from the last time you saved. Different combinations of errors will result in other errors such as the for loop never beginning, or the results being skewed from what is expected, but these are not as serious and can usually be remedied by fixing the conditions of your for loop.
| Operator | Expression |
|---|---|
| > | Greater than |
| < | Less than |
| === | Is equal to |
| >= | Greater than or equal to |
| <= | Less than or equal to |
| != | Not equal to |
More For Loop Examples
Here are some examples of projects that use for loops to create complex designs. Try to determine how all three statements of the for loop work and how they create the resulting patterns for each code embedded below:
See the Pen Example Code by LSU DDEM ( @lsuddem) on CodePen.
https://codepen.io/lsuddem/pen/oyWEqrSee the Pen Example Code by LSU DDEM ( @lsuddem) on CodePen.
https://codepen.io/lsuddem/pen/NzjyLgOne way to think about for loops is that they behave like an super-powerful conditional statement: You create a test, and the loop will run for as long as the test result is true, just like a conditional statement. The main difference is that you are now creating a set of rules for how many times your test can repeat itself before it automatically stops.
Nested For Loops
Nested For Loops allow us to combine two loops that work together to create even more complex data parsing and graphical pattern drawing. Let’s learn more about how Nested For Loops work by reading on. Take a look at this first code example below. It uses two separate for loops that work independently from one another to draw a horizontal line of pink squares and a vertical line of orange squares (note that the first pink square is actually covering up the first orange square, since both are drawn at 0 X:
See the Pen Example Code by LSU DDEM ( @lsuddem) on CodePen.
https://codepen.io/lsuddem/pen/MXmQpOIf we wanted to make a grid of squares, we could combine these two for loops into a nested for loop. We start by temporarily removing the result code from both the first and second loop, then cutting the second loop and pasting it into the result brackets of the first loop. here is what the structure of a nested for loop looks like:
for (create outer variable; outer test; update outer variable){
    for (create inner variable; inner test; update inner variable){
      repeated result block
    }
}
Now, we can use just one of the result-block codes from before, but this time, let’s use the variable x to determine each square’s X axis location and the variable y to determine each square’s Y axis location. Now, our code will look like the embedded example below, and we will have one large grid of equally-spaced squares instead of two adjacent rows!
See the Pen Example Code by LSU DDEM ( @lsuddem) on CodePen.
https://codepen.io/lsuddem/pen/OYaGVZTo understand how these two loops operate together, we could create a nested for loop that logs data to the console. Open a new project page in the p5.js Web Editor and copy the code below into either the setup( ) or draw( ) blocks:
for(let i = 0; i <= 4; i++){
   for(let j = 0; j <= 4; j++){
     console.log("Outer Loop: " + i + ":" + " " + "Inner Loop: " + j);
    }
}
Now look at your console. You should see the following text printed out:
Outer Loop: 0: Inner Loop: 0
Outer Loop: 0: Inner Loop: 1
Outer Loop: 0: Inner Loop: 2
Outer Loop: 0: Inner Loop: 3
Outer Loop: 0: Inner Loop: 4

Outer Loop: 1: Inner Loop: 0
Outer Loop: 1: Inner Loop: 1
Outer Loop: 1: Inner Loop: 2
Outer Loop: 1: Inner Loop: 3
Outer Loop: 1: Inner Loop: 4

Outer Loop: 2: Inner Loop: 0
Outer Loop: 2: Inner Loop: 1
Outer Loop: 2: Inner Loop: 2
Outer Loop: 2: Inner Loop: 3
Outer Loop: 2: Inner Loop: 4

Outer Loop: 3: Inner Loop: 0
Outer Loop: 3: Inner Loop: 1
Outer Loop: 3: Inner Loop: 2
Outer Loop: 3: Inner Loop: 3
Outer Loop: 3: Inner Loop: 4

Outer Loop: 4: Inner Loop: 0
Outer Loop: 4: Inner Loop: 1
Outer Loop: 4: Inner Loop: 2
Outer Loop: 4: Inner Loop: 3
Outer Loop: 4: Inner Loop: 4
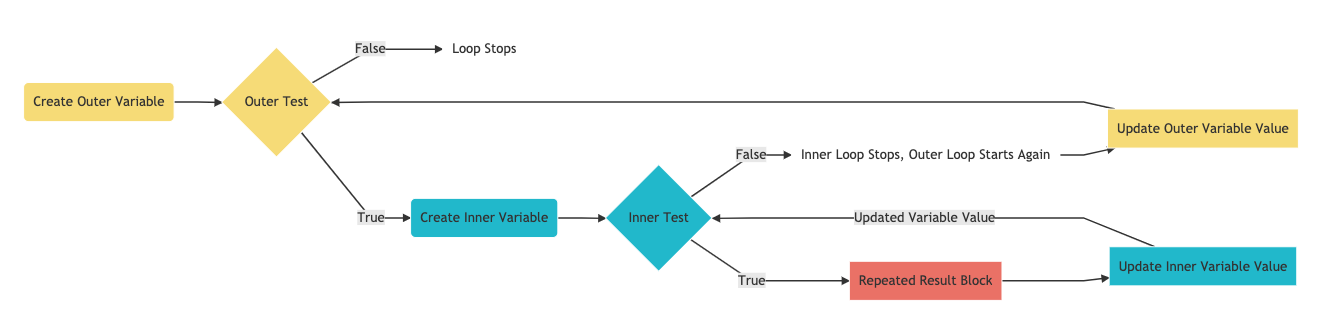
What does this tell us? It shows us that when we nest for loops, they both work together in a unique way: the outer loop starts first and completes just one run of the shared result code if its test can pass. Then, it pauses and lets the inner loop complete all of its runs until the inner loop’s test fails and, causing it to stop. Now, the outer loop wakes up and runs a second time. Once that second run is finished, it lets the inner loop run its entire series of loops again! This continues to happen until the outer loop has completely exhausted its chances to run while its test can still be passed.
The following logic chart breaks down the basic concept behind how a nested for loop works:
To better understand how a nested for loop works, play with the embedded code below by moving your mouse from left to right across the canvas. The position of your mouseX and mouseY variables determine the total number of times the inner and outer loops run, adding/subtracting more circles in groups as your mouse moves:
See the Pen Example Code by LSU DDEM ( @lsuddem) on CodePen.
https://codepen.io/lsuddem/pen/gJQEMwHere is another example of a nested for loop. Study this example to see how it works:
See the Pen Example Code by LSU DDEM ( @lsuddem) on CodePen.
https://codepen.io/lsuddem/pen/LryQWq