Computers Making Choices - Conditionals
Creating a Test
Computers are extremely powerful machines, but without our help, they cannot make choices and decisions on their own. In order to make our web projects smarter and more interactive, we need to first learn how to design tests and reactions that computers can understand.
A conditional is a statement that tells our code to perform certain actions based on whether a test we devised has been passed or failed. All conditionals will contain both a test and a result. Our daily lives are filled with conditional statements that dictate what we can do and when we can do it. For example, if the weather is nice, then we can go outside, otherwise we need to stay indoors and wait for the weather to clear. In this instance, the test is a check to see if the weather conditions are safe enough for us to head outdoors, and the result is either us leaving the house to play outside, or more repeats of the test.
Most of our tests in web programing will boil down to measuring boolean conditions, which can be one of two possible values: true or false. We can design tests that measure a certain condition and only allow us to pass that test if the condition is either met (true) or not met (false). This is extremely common for conditionals that test to see if a user has interacted with your project through mouse clicks or keyboard presses, since those two objects can only produce two different states: clicked/pressed or un-clicked/un-pressed.
We can also design tests that compare the relationship between two values and only pass based on what that relationship is. The chart below lists some common relational expressions (many of which you may have encounter in math class) and the symbols we use in JavaScript to add them into our code:
Common relational expressions
| Operator | Expression |
|---|---|
| > | Greater than |
| < | Less than |
| === | Is equal to |
| >= | Greater than or equal to |
| <= | Less than or equal to |
| != | Not equal to |
We might need to make tests that ask for more than one condition to be measured at a time, allowing the test to pass only if both conditions are met or if either one or more options listed are met. In these cases, we can chain conditions together with the && operator (which stands for “and”) or use the || operator (which stands for “or”) to allow for two passable options for a single test:
Common logic expressions
| Operator | Expression |
|---|---|
| && | and |
| || | or |
Let’s take a look at some common conditional statements and see how we code them into our projects.
Single Test, Single Result (The If Statement)
The most commonly-used conditional is called the If Statement, and it is comprised of a single test (which could be made up of many sub-conditionals linked together with and or or operators) and a single result. Logically, an If Statement acts like the diagram below: if we pass the test, we get to run any code we designate as the result; if we fail the test, we continue to take the test until we pass it. The rest of our code outside of our If Statement continues to run as normal:
Translated into code, an If Statement looks like this:
if (test) {
  result
}
Pay close attention to the various symbols in the code example above. Every Conditional statement will include a keyword(s), a pair of parenthesis, and a pair of braces ( { } ). The code inside of those symbols is extremely important: the tests that make up the conditional must always go inside of the parenthesis. Any code that we want to run as the result of passing the test (whether it be one line or one thousand lines) must be contained inside of the { } brackets. A good way to remember this separation of test code and result code is to imagine playing a video game where the sole purpose is to enter a locked room to reach a treasure. In the scenario, the locked door and barrier keeping you from the treasure is any test code placed inside the parenthesis. The treasure itself is any result code placed inside of the brackets:

The embedded code below shows an If Statement in action. Clicking and dragging your mouse along the gray canvas draws lines made of teal squares. The test measures the mouseIsPressed system variable from our previous lesson and waits to see if it contains the boolean value “true.” If it does, a teal square is produced by running the two lines of code found inside of the braces. If it doesn’t, the test continues to check and wait to see when it will be passed because we have placed it inside of the draw( ) loop. The code outside of the If Statement continues to run regardless:
See the Pen Example Code by LSU DDEM ( @lsuddem) on CodePen.
https://codepen.io/lsuddem/pen/aKWKmjLET’S PRACTICE!
Look at the code below (you can copy it into a p5 sketch if you want)
function draw(){
  background(220);
  if(mouseX > pmouseX){
   fill(0, 255, 0);
   ellipse(width / 2, height / 2, 200, 200);
  }
}
- What is this conditional testing for and what are the results for the cod passing the test?
- How could you change this test so that the code behaves in the opposite manner?
Single Test, Two Results (The If/Else Statement)
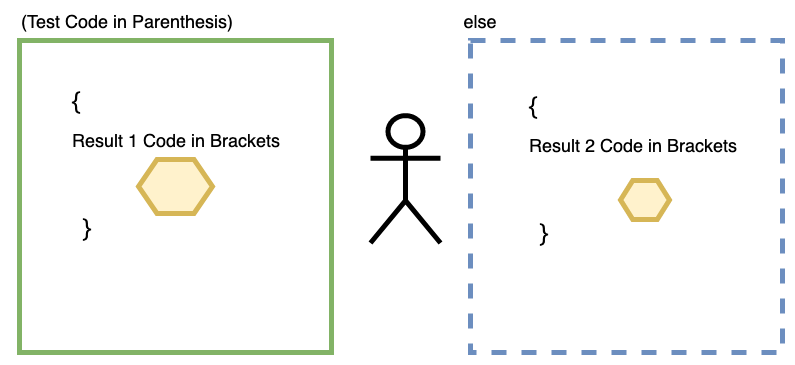
A more advanced conditional statement is the If/Else Statement. This statement is comprised of a single test just like the If statement, but we have two different results that can occur: one for passing the test and one for failing the test. This is similar to receiving a conciliation prize after attempting to win the grand prize. Logically, the IF/Else statement acts like the diagram below: if we pass the test, we get to run any code we designate as the result, else we run any code designated as a secondary result. When we fail the test, we continue to take the test until we pass it and continue to run the secondary result code. The rest of our code outside of our If/Else Statement continues to run as normal:
Translated into code, an If/Else statement looks like this:
if (test) {
  result 1
} else {
  result 2
}
Notice how similar this looks to our If Statement. The only difference is the addition of a second keyword (else), another pair of brackets, and any code we want to act as the secondary result code, located within the second pair of brackets. Using our video game analogy from before, the second pair of brackets is similar to a new, blue room that we are sent to only if we try to enter our green-barrier treasure room and fail to do so.
The code embedded below modifies out original square drawing code by changing our If Statement to an If/Else Statement. Our test is still the same: it measures the mouseIsPressed variable and waits to see if it contains the boolean value “true.” If it does, a teal square is produced. If the mouseIsPressed variable contains the boolean value “false”, the code in our else block is run, giving us the secondary result of drawing peach circles to the screen instead. The code outside of the If Statement continues to run regardless:
See the Pen Example Code by LSU DDEM ( @lsuddem) on CodePen.
https://codepen.io/lsuddem/pen/YvVvwMMultiple Tests, Multiple Results (The If/Else If Statement)
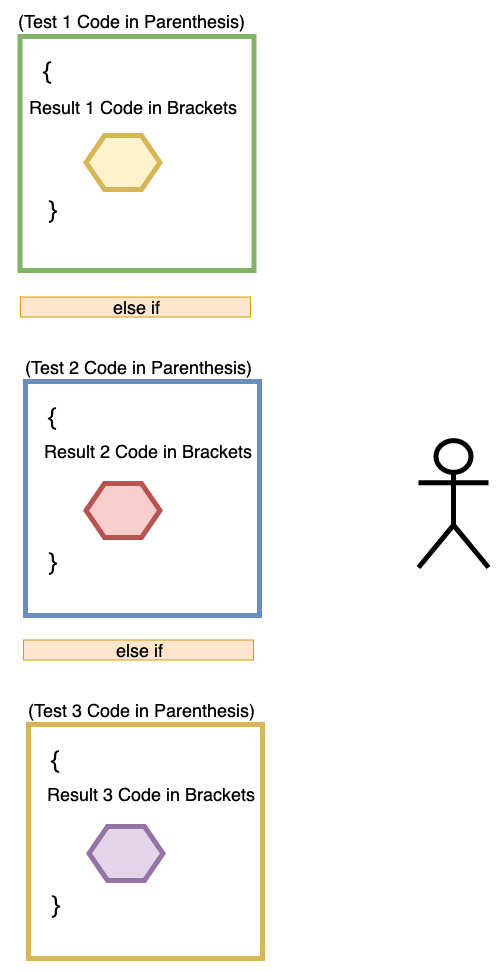
Yet another, more advanced logic flow can be created by creating conditionals that chain together multiple test/result pairs, creating an If/Else If Statement. This statement is comprised of as many tests and corresponding result blocks as we see fit, each utilizing its own set of if/else keywords, parenthesis, and brackets. Logically, the IF/Else IF Statement looks like the diagram below:
Translated into code, an If/Else If statement looks like this:
if (test 1) {
  result 1
} else if (test 2) {
  result 2
}
Notice the formatting in this structure. Instead of following our else keyword with an open bracket, we immediately follow it with the if keyword and another test/result pair. We can continue this chaining to make If/Else If Statements that comprise as many different options for tests and results as we need. Now our video game analogy becomes a bit more complex: we can approach multiple rooms, each with their own barriers and their own separate treasures. If we can’t pass through the first room, we try to pass through the second. If we can pass through any of the barriers, we will receive whatever is inside of that specific room, but not all of the treasure in all of the rooms:
We can now make one final modification to our embedded code and change our If/Else Statement into an If/Else If Statement! In this version below, we’ve divided the screen vertically into three equal sections and designed three test/result pairs to chain together. Each of these tests is comprised of multiple sub-conditionals: they all start by checking to see if mouseIsPressed contains “true”, and they all ask for additional conditions to be simultaneously satisfied through the use of the && operator. Based on the portion of the canvas our mouse’s Y location falls within, we will either draw a teal square, a pink square, or a peach circle. As always, he code outside of the If Statement continues to run regardless:
See the Pen Example Code by LSU DDEM ( @lsuddem) on CodePen.
https://codepen.io/lsuddem/pen/zaGpgpBuilding extensive If/Else If Statements can end up making your code look cluttered and hard to debug if certain tests aren’t acting the way they should. In our Graphics Unit, we’ll learn how to nest a conditional test inside of another test in order to make more clean-looking, sensical logic flows for advanced projects.