Measuring the Boundaries of a Shape
The next few lessons go over the beginnings of interacting with our code in new and dynamic ways.
In your projects, you’ll often want to have interactive mouse events tied to specific shapes or drawings. This makes your codes much more interesting and dynamic for you or anyone else who interacts with them. It’s important to remember that any shape or object drawn on the canvas can’t simply be referred to by name, since p5.js has no way of knowing the difference between a green triangle or a pink square. In order to determine whether or not a user has clicked on a 2D object, we have to use conditional statements to measure whether or not the mouse click occurred within the boundaries of that object.
The process of tracking and reacting to mouse clicks on objects will becomes easier with the use of a specialty library, particularly ones used to make game development more intuitive. We’ll begin working with just such a library, p5.play.js, in the next chapter. However, to understand how the library is functioning, we first need to go over the basic concepts and math involved. to determine when an object is being interacted with, and how it can respond to that interaction.
Stationary Shape Measurements
The logic involved with determining the boundaries of various stationary shapes is relatively similar even if a shape is moving across the canvas. However, since it is easier to test that your code is functioning properly when the target isn’t moving across the screen, lets begin with stationary shapes.
Squares and Rectangles
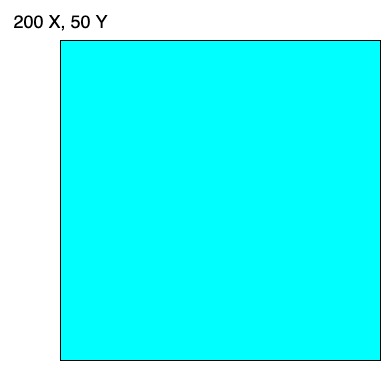
Let’s imagine that you want to register whenever a user clicks their mouse inside of the square drawn below. The function called to draw the square looks like this:
//rect(x, y, w, h);
rect(200, 50, 150, 150);
The coordinates of the upper-left corner of the square match the first two arguments of our rect() function. Using basic math and the last two arguments of the function, we can figure out the coordinates of the remaining corners:
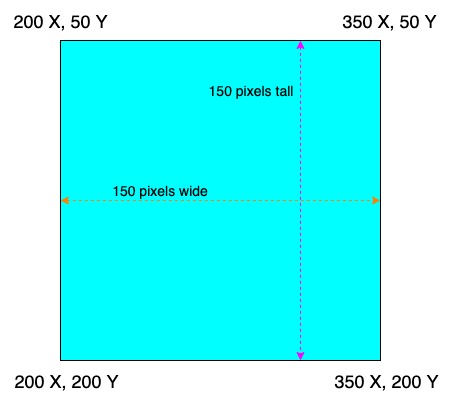
Now we can see that the corners of our rectangle have a handful of shared coordinates. Let’s look at our shape again, highlighting the four significant borders we need to measure (pink for our X coordinates, orange for our Y coordinates) and image what we should measure to know when our mouse cursor has landed inside:
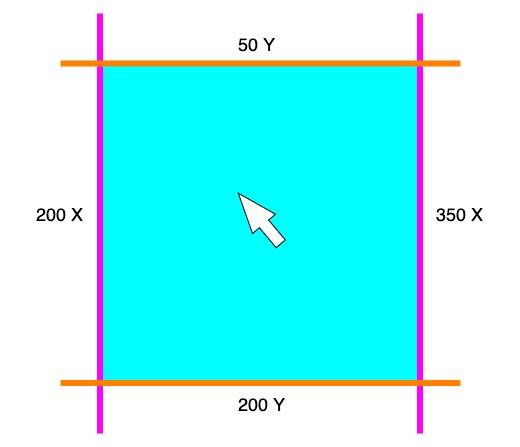
Based on our math, we need to code a test that can only pass if our mouse is clicked and if it’s located at a point greater than 200 X and less than 350 X and less than 200 Y and greater than 50 Y. We can do this by making a conditional that measures all four of those conditions simultaneously. As a reminder, the && operator will stand in for the word “and” in our test. The following code demonstrates a border measurement click test, causing the background color to change only when we click inside the bounds of the square:
See the Pen Example Code by LSU DDEM ( @lsuddem) on CodePen.
https://codepen.io/lsuddem/pen/zQjwzvLet’s Practice
Try modifying this code by removing the “mouseIsPressed” portion of the test (be careful of the parentheses and the brackets) in the code above. This allows the background to change automatically when the mouse cursor simply hovers over the square.
You’ll notice that the individual greater than/lesser than tests in the example above are incased inside of parenthesis pairs. This is done in order to make out code look cleaner and to make each portion of this multi-portion test easier to identify. Be careful to count your individual symbols and not leave out the essential parenthesis that forms the if ( ) test format!
As you will see later on, the idea of measuring the boundary of a rectangle is important to several upcoming concepts and assignments. Be sure to take the time to go through all of the codes provided to make sure you have a solid understanding of te concept.
Circles
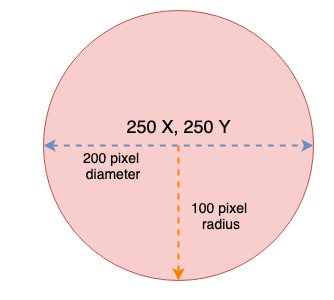
Measuring the boundaries of a circle is a slightly more challenging task, since there are no sides for us to measure. Instead, we’ll need to know the coordinates of the circle’s center, the diameter of the circle, and its radius:
//ellipse(x, y, w, h)
ellipse(200, 200, 150, 150);
The first three values we need to determine the boundary of a circle can be found as the four arguments passed into the ellipse( ) function called to draw the circle to the canvas. (to make a circle with ellipse(), the last two arguments need to be identical) The circle’s radius is half of its diameter. We should declare a variable to hold that result of the circle’s diameter divided by 2 so that we can use that value later.
//diameter is equal to the 3rd (and 4th) argument in the ellipse function.
let radius = diameter / 2;
//if the diameter of a circle was 150, then the line would look like let radius = 150 / 2;
This variable should be declared globally so that we cat set all of the values in setup().
Since the radius is the distance between the center of the circle and its outer perimeter, our next step is find a way to trigger an event whenever our mouseX and mouseY variables cross that perimeter. If we can compare the value in our circle radius variable against the distance between the current mouse location and the circle’s center, we could use that to test if our mouse has hovered over or been been clicked inside of our circle:
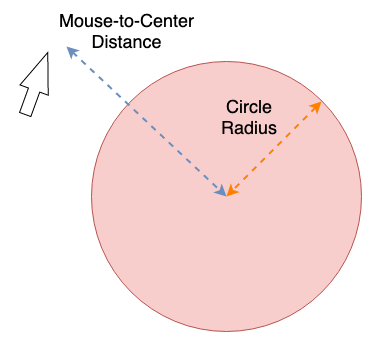
To accomplish this, we can use p5.js’ dist() function. This function lets us pass in two pairs of X/Y coordinates and returns the number of pixels between those two points. If you want, you could manually recreate this math using the distance formula, but using dist() saves a lot of time.
Using this function, we then need to devise a test that compares the distance between our mouse location and the circle’s center with the circle’s radius value. The test should only pass if the distance value is less than the radius value and if the mouse is clicked. Storing the ever-changing result of our dist() function inside of a variable will make this test easier to understand, and the code embedded below shows an example of what this test should look like:
See the Pen Example Code by LSU DDEM ( @lsuddem) on CodePen.
https://codepen.io/lsuddem/pen/VOxWyqBecause the radius is half of the diameter, a value we need to draw the circle, we can simply calculate the value of r by dividing our circleDiam value by 2. Then we need to continually check the distance between the mouse’s location on the canvas and the center of our circle. By storing this distance in a variable (that updates every time the mouse moves) we can compare this value with our radius and determine when the circle’s threshold has been crossed. Once this happens, we can have whatever results we want occur.
Let’s Practice
This last section was a little math-intensive. What it all boils down to is storing the proper values in variables so that we can check them with a conditional statement.
if(radius > mouseDistanceFromCenter){
    circleReacts();
}
The interactions used in this lesson are fairly basic; just changing colors. However you can set the shapes to react however you want. Use the code examples in this lesson as a starting place to device a sketch with a rectangle and a circle. Have those shapes act as a trigger for something else to appear on the screen other than color changing.
For an added level of difficulty, create an additional test to have the reaction only happen when the shapes are clicked. This will effective turn the basic shapes we have been making into a button.
One thing to note is that you are not interacting directly with the shape that is visible on the canvas. In reality an invisible boundary is being set up that (intentionally) matches the measurements of our shapes. Try commenting out the rect() or ellipse() functions in any of these codes (leave everything else) and you will see that they still function if you click where the shape is no longer being drawn. If you want to have the shape directly interact with the interaction, you would have to crete the shapes as objects in a class, and give them a method to measure the boundaries and react. See the lesson on objects and classes to review how to do that.
Moving Shape Measurements
The techniques learned above will also work for shapes that are moving across the canvas. The only difference in our boundary measurement tests will is the need to measure our mouse location against variables that stand in for the ever-changing location of the shape’s edges/centers. Take a look at the code below and test it out. The background will change to different colors when you click on the square versus when you click on the circle. Compare this code to the ones we studied above:
See the Pen Example Code by LSU DDEM ( @lsuddem) on CodePen.
https://codepen.io/lsuddem/pen/vwjWEaNotice how the shape parameters are all variables instead of being hard-coded like before. Because the logic is still the same regardless of the shape position, we can substitute and variety of values and achieve a consistent effect. This is why the shapes can move and still be measured. Try changing the variable values and you will see that the code still contains the same functionality.
Let’s Practice!
Looking at the code above, we can see that by updating variables in the draw() function and using those values to both draw our shapes and set up the conditional statements, we can determine an interaction with a shape even when it is moving! If the code is formatted properly, this will also be true for if the shape chagos size.
Use the above code as a template so set up a shape that is constantly changing one or more of its size parameters (keep in mind that for the math to work, you need to keep all ellipses as circles, not ovals). Can you get the code to react with interactions on the size-changing shapes?